After acquiring a pair of New Packet Radio modems on behalf of VECTOR, I set it up on my Linux machine and ran some basic tests to check whether it could achieve the advertised 500 kbps transfer rates, which are much higher than AX25) packet radio.
The exact equipment I used was:

Radio setup
After connecting the modems to the power supply and their respective
antennas, I connected both modems to my laptop via micro-USB cables and used
minicom to connect to their
console on /dev/ttyACM[01]:
minicom -8 -b 921600 -D /dev/ttyACM0
minicom -8 -b 921600 -D /dev/ttyACM1
To confirm that the firmware was the latest one, I used the following command:
ready> version
firmware: 2020_02_23
freq band: 70cm
then I immediately turned off the radio:
radio off
which can be verified with:
status
Following the British Columbia 70 cm band plan, I picked the following frequency, modulation (bandwidth of 360 kHz), and power (0.05 W):
set frequency 433.500
set modulation 22
set RF_power 7
and then did the rest of the configuration for the master:
set callsign VA7GPL_0
set is_master yes
set DHCP_active no
set telnet_active no
and the client:
set callsign VA7GPL_1
set is_master no
set DHCP_active yes
set telnet_active no
and that was enough to get the two modems to talk to one another.
On both of them, I ran the following:
save
reboot
and confirmed that they were able to successfully connect to each other:
who
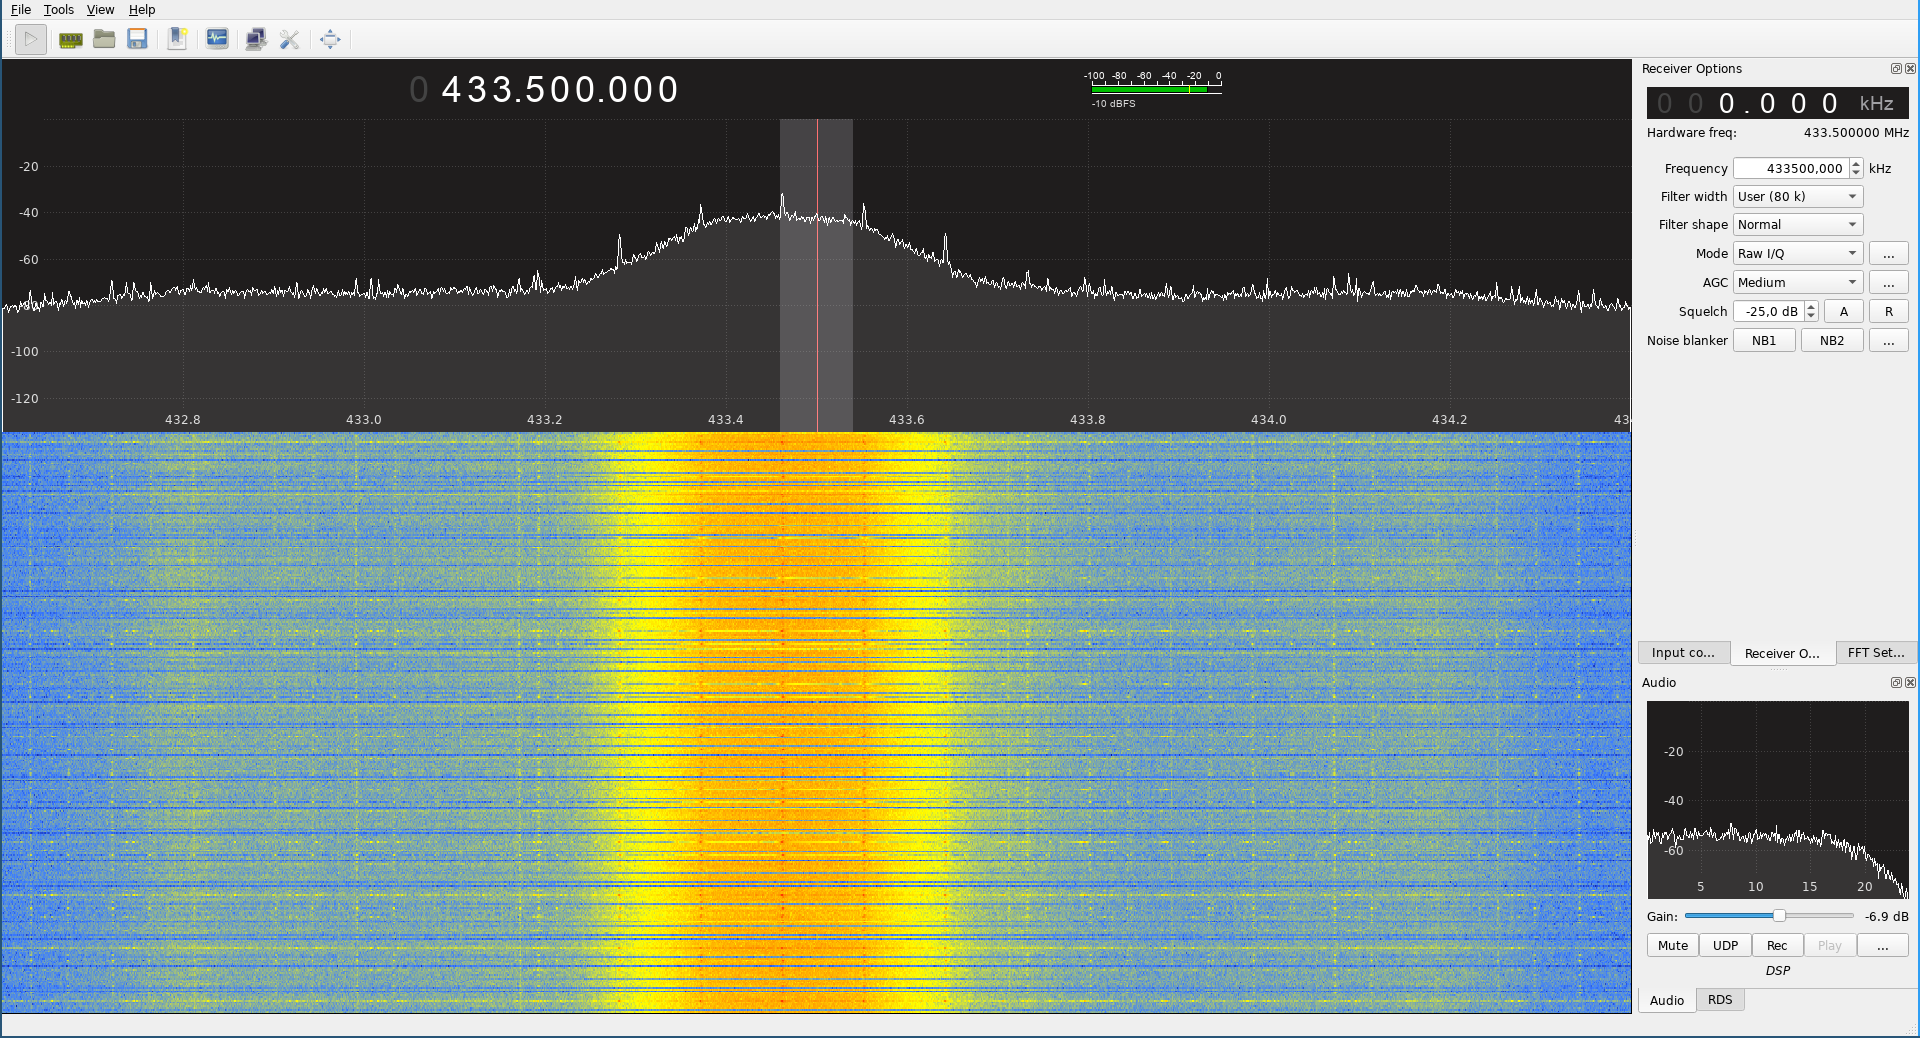
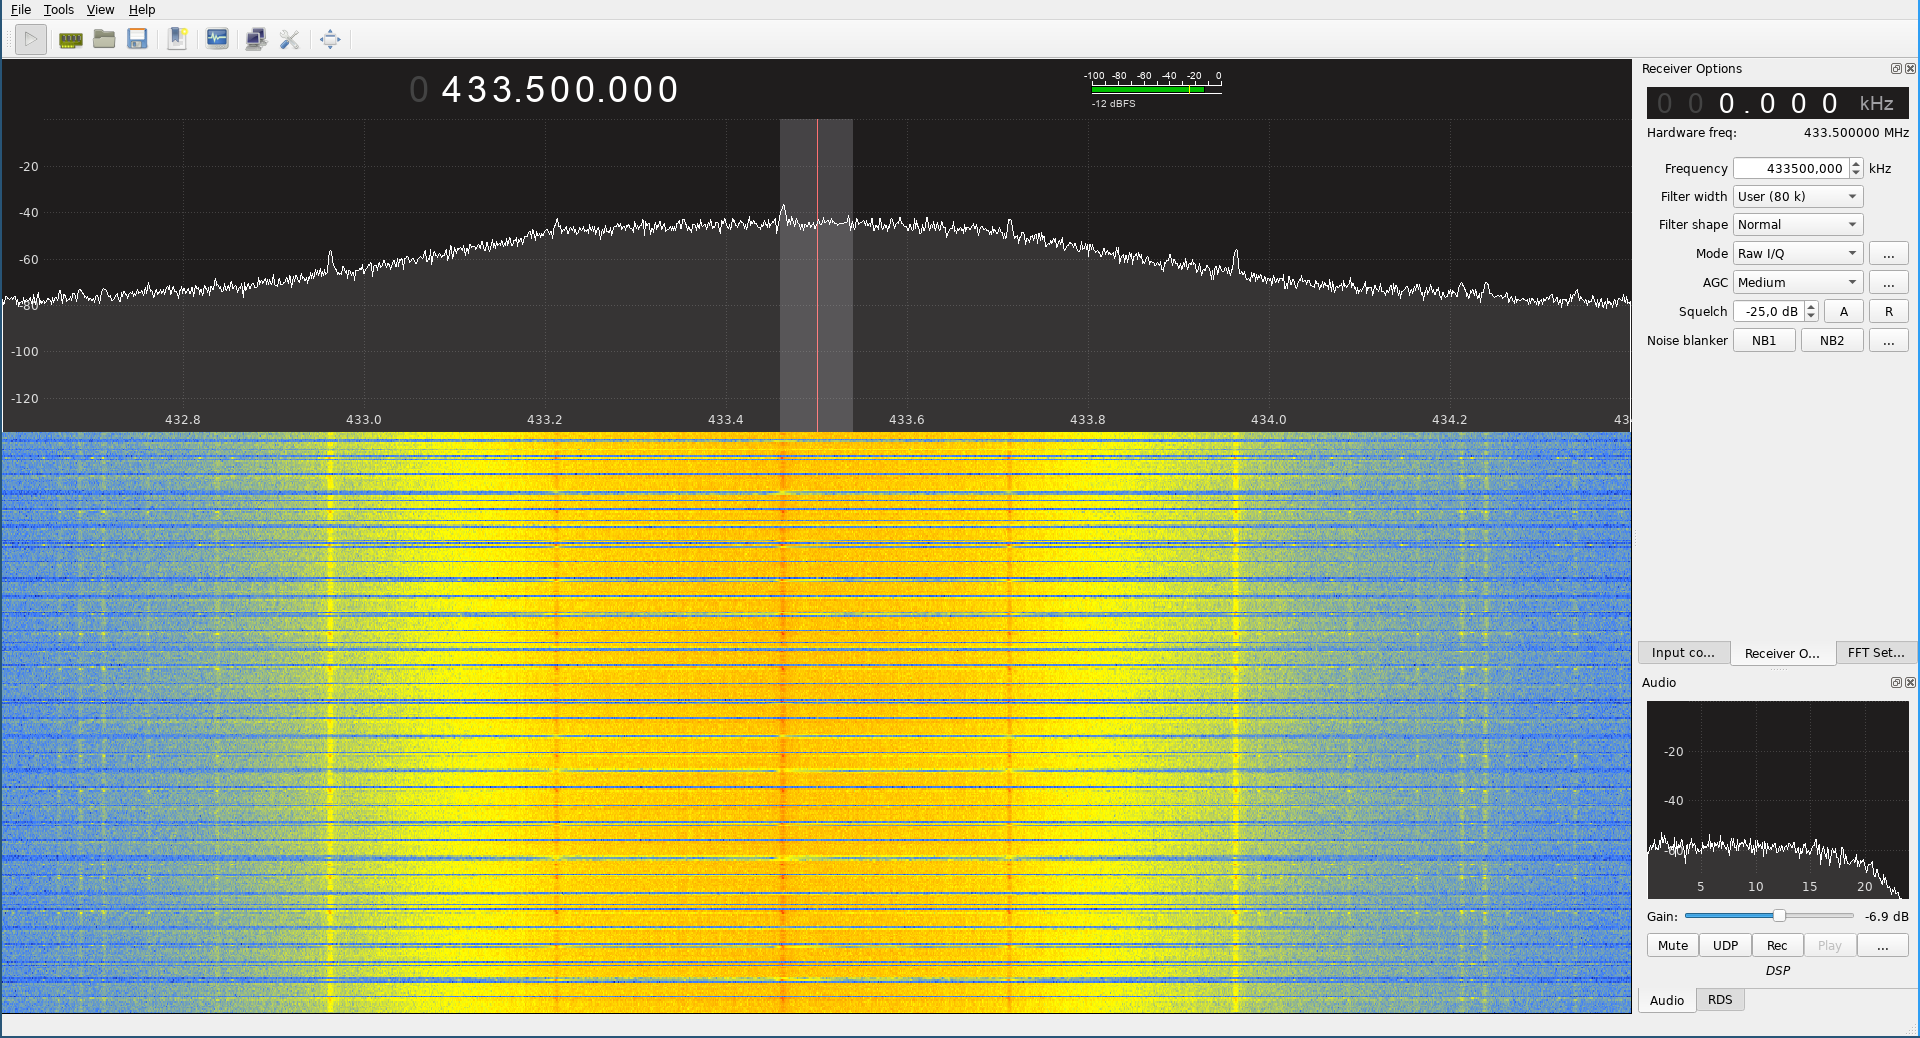
Monitoring RF
To monitor what is happening on the air and quickly determine whether or not the modems are chatting, you can use a software-defined radio along with gqrx with the following settings:
frequency: 433.500 MHz
filter width: user (80k)
filter shape: normal
mode: Raw I/Q
I found it quite helpful to keep this running the whole time I was working with these modems. The background "keep alive" sounds are quite distinct from the heavy traffic sounds.
IP setup
The radio bits out of the way, I turned to the networking configuration.
On the master, I set the following so that I could connect the master to my
home network (192.168.1.0/24) without conflicts:
set def_route_active yes
set DNS_active no
set modem_IP 192.168.1.254
set IP_begin 192.168.1.225
set master_IP_size 29
set netmask 255.255.255.0
(My router's DHCP server is configured to allocate dynamic IP addresses from
192.168.1.100 to 192.168.1.224.)
At this point, I connected my laptop to the client using a CAT-5 network cable and the master to the ethernet switch, essentially following Annex 5 of the Advanced User Guide.
My laptop got assigned IP address 192.168.1.225 and so I used another
computer on the same network to ping my laptop via the NPR modems:
ping 192.168.1.225
This gave me a round-trip time of around 150-250 ms.
Performance test
Having successfully established an IP connection between the two machines, I decided to run a quick test to measure the available bandwidth in an ideal setting (i.e. the two antennas very close to each other).
On both computers, I installed iperf:
apt install iperf
and then setup the iperf server on my desktop computer:
sudo iptables -A INPUT -s 192.168.1.0/24 -p TCP --dport 5001 -j ACCEPT
sudo iptables -A INPUT -s 192.168.1.0/24 -u UDP --dport 5001 -j ACCEPT
iperf --server
On the laptop, I set the MTU to 750 in NetworkManager:
and restarted the network.
Then I created a new user account (npr with a uid of 1001):
sudo adduser npr
and made sure that only that account could access the network by running the
following as root:
# Flush all chains.
iptables -F

# Set defaults policies.
iptables -P INPUT DROP
iptables -P OUTPUT DROP
iptables -P FORWARD DROP

# Don't block localhost and ICMP traffic.
iptables -A INPUT -i lo -j ACCEPT
iptables -A INPUT -p icmp -j ACCEPT
iptables -A OUTPUT -o lo -j ACCEPT

# Don't re-evaluate already accepted connections.
iptables -A INPUT -m conntrack --ctstate RELATED,ESTABLISHED -j ACCEPT
iptables -A OUTPUT -m conntrack --ctstate RELATED,ESTABLISHED -j ACCEPT

# Allow connections to/from the test user.
iptables -A OUTPUT -m owner --uid-owner 1001 -m conntrack --ctstate NEW -j ACCEPT

# Log anything that gets blocked.
iptables -A INPUT -j LOG
iptables -A OUTPUT -j LOG
iptables -A FORWARD -j LOG
then I started the test as the npr user:
sudo -i -u npr
iperf --client 192.168.1.8
Results
The results were as good as advertised both with modulation 22 (360 kHz bandwidth):
$ iperf --client 192.168.1.8 --time 30
------------------------------------------------------------
Client connecting to 192.168.1.8, TCP port 5001
TCP window size: 85.0 KByte (default)
------------------------------------------------------------
[  3] local 192.168.1.225 port 58462 connected with 192.168.1.8 port 5001
[ ID] Interval       Transfer     Bandwidth
[  3]  0.0-34.5 sec  1.12 MBytes   274 Kbits/sec

------------------------------------------------------------
Client connecting to 192.168.1.8, TCP port 5001
TCP window size: 85.0 KByte (default)
------------------------------------------------------------
[  3] local 192.168.1.225 port 58468 connected with 192.168.1.8 port 5001
[ ID] Interval       Transfer     Bandwidth
[  3]  0.0-42.5 sec  1.12 MBytes   222 Kbits/sec

------------------------------------------------------------
Client connecting to 192.168.1.8, TCP port 5001
TCP window size: 85.0 KByte (default)
------------------------------------------------------------
[  3] local 192.168.1.225 port 58484 connected with 192.168.1.8 port 5001
[ ID] Interval       Transfer     Bandwidth
[  3]  0.0-38.5 sec  1.12 MBytes   245 Kbits/sec
and modulation 24 (1 MHz bandwitdh):
$ iperf --client 192.168.1.8 --time 30
------------------------------------------------------------
Client connecting to 192.168.1.8, TCP port 5001
TCP window size: 85.0 KByte (default)
------------------------------------------------------------
[  3] local 192.168.1.225 port 58148 connected with 192.168.1.8 port 5001
[ ID] Interval       Transfer     Bandwidth
[  3]  0.0-31.1 sec  1.88 MBytes   506 Kbits/sec

------------------------------------------------------------
Client connecting to 192.168.1.8, TCP port 5001
TCP window size: 85.0 KByte (default)
------------------------------------------------------------
[  3] local 192.168.1.225 port 58246 connected with 192.168.1.8 port 5001
[ ID] Interval       Transfer     Bandwidth
[  3]  0.0-30.5 sec  2.00 MBytes   550 Kbits/sec

------------------------------------------------------------
Client connecting to 192.168.1.8, TCP port 5001
TCP window size: 85.0 KByte (default)
------------------------------------------------------------
[  3] local 192.168.1.225 port 58292 connected with 192.168.1.8 port 5001
[ ID] Interval       Transfer     Bandwidth
[  3]  0.0-30.0 sec  2.00 MBytes   559 Kbits/sec
I ran into filesystem corruption
(ext4) on the root partition of my
backup server
which caused it to go into read-only mode. Since it's the root partition,
it's not possible to unmount it and repair it while it's running. Normally I
would boot from an Ubuntu live CD / USB
stick, but in this case
the machine is using the
mipsel architecture and
so that's not an option.
Repair using a USB enclosure
I had to pull the shutdown the server and then pull the SSD drive out. I then moved it to an external USB enclosure and connected it to my laptop.
I started with an automatic filesystem repair:
fsck.ext4 -pf /dev/sde2
which failed for some reason and so I moved to an interactive repair:
fsck.ext4 -f /dev/sde2
Once all of the errors were fixed, I ran a full surface scan to update the list of bad blocks:
fsck.ext4 -c /dev/sde2
Finally, I forced another check to make sure that everything was fixed at the filesystem level:
fsck.ext4 -f /dev/sde2
Fix invalid alternate GPT
The other thing I noticed is this messge in my dmesg log:
scsi 8:0:0:0: Direct-Access     KINGSTON  SA400S37120     SBFK PQ: 0 ANSI: 6
sd 8:0:0:0: Attached scsi generic sg4 type 0
sd 8:0:0:0: [sde] 234441644 512-byte logical blocks: (120 GB/112 GiB)
sd 8:0:0:0: [sde] Write Protect is off
sd 8:0:0:0: [sde] Mode Sense: 31 00 00 00
sd 8:0:0:0: [sde] Write cache: enabled, read cache: enabled, doesn't support DPO or FUA
sd 8:0:0:0: [sde] Optimal transfer size 33553920 bytes
Alternate GPT is invalid, using primary GPT.
 sde: sde1 sde2
I therefore checked to see if the partition table looked fine and got the following:
$ fdisk -l /dev/sde
GPT PMBR size mismatch (234441643 != 234441647) will be corrected by write.
The backup GPT table is not on the end of the device. This problem will be corrected by write.
Disk /dev/sde: 111.8 GiB, 120034123776 bytes, 234441648 sectors
Disk model: KINGSTON SA400S3
Units: sectors of 1 * 512 = 512 bytes
Sector size (logical/physical): 512 bytes / 512 bytes
I/O size (minimum/optimal): 512 bytes / 512 bytes
Disklabel type: gpt
Disk identifier: 799CD830-526B-42CE-8EE7-8C94EF098D46

Device       Start       End   Sectors   Size Type
/dev/sde1     2048   8390655   8388608     4G Linux swap
/dev/sde2  8390656 234441614 226050959 107.8G Linux filesystem
It turns out that all I had to do, since only the backup / alternate GPT partition table was corrupt and the primary one was fine, was to re-write the partition table:
$ fdisk /dev/sde

Welcome to fdisk (util-linux 2.33.1).
Changes will remain in memory only, until you decide to write them.
Be careful before using the write command.

GPT PMBR size mismatch (234441643 != 234441647) will be corrected by write.
The backup GPT table is not on the end of the device. This problem will be corrected by write.

Command (m for help): w

The partition table has been altered.
Syncing disks.
Run SMART checks
Since I still didn't know what caused the filesystem corruption in the first place, I decided to do one last check: SMART errors.
I couldn't do this via the USB enclosure since the SMART commands aren't forwarded to the drive and so I popped the drive back into the backup server and booted it up.
First, I checked whether any SMART errors had been reported using smartmontools:
smartctl -a /dev/sda
That didn't show any errors and so I kicked off an extended test:
smartctl -t long /dev/sda
which ran for 30 minutes and then passed without any errors.
The mystery remains unsolved.