Thanks to a fellow VECTOR volunteer Nick Doyle, I found out that the International Space Station would be broadcasting slow-scan television images at the end of the year. I decided to try and pick those up with my handheld radio.
Planning
From the official announcement, I got the frequency (145.800 MHz) and the broadcast times.
Next I had to figure out when the ISS would be passing over my location. Most of the ISS tracking websites and applications are aimed at people wanting to see the reflection of the sun on the station and so they only list the passes during nighttime before the earth casts a shadow that would prevent any visual contacts.
Thankfully, Nick found a site which has a option to show all of the passes, visible or not and so I was able to get a list of upcoming passes over Vancouver.
Hardware
From a hardware point-of-view, I didn't have to get any special equipment. I used my Kenwood D72 and an external Comet SBB5 mobile antenna.
The only other pieces of equipment I used was a 2.5mm mono adapter which I used to connect a 3.5mm male-male audio cable in the speaker port of the radio and the microphone input of my computer.
Software
The software I used for the recording was Audacity set to a sampling rate of 48 kHz.
Then I installed qsstv and configured it to read input from a file instead of the sound card.
Results
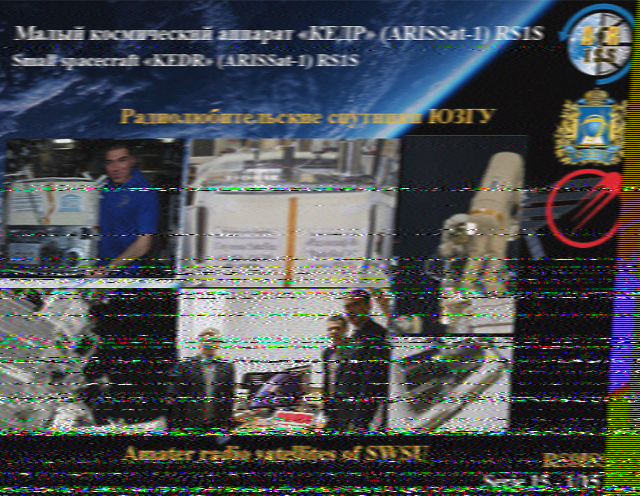
Here is the audio I recorded from the first pass (65 degrees at the highest point) as well as the rendered image:
The second pass (60 degrees) was not as successful since I didn't hold the squelch open and you can tell from the audio recording that the signal got drowned in noise a couple of times. This is the rendering of that second pass:

Tips
The signal came through the squelch for only about a minute at the highest
point, so I found it best to open the squelch fully (F+Moni) as soon as
the bird is visible.
Another thing I did on a third pass (16 degrees at the highest point -- not particularly visible) was to plug the speaker out of my radio into a Y splitter so that I could connect it to my computer and an external speaker I could take outside with me. Since I was able to listen to the audio, I held the antenna and tried to point it at the satellite's general direction as well as varying the orientation of the antenna to increase the signal strength.
In-flight and hotel WiFi can be quite expensive and often insist on charging users extra to connect multiple devices. In order to avoid that, it's possible to easily create a WiFi hotspot using NetworkManager and a external USB WiFi adapter.
Dependencies
The dnsmasq package package is required in order to run a local DHCP server for any clients connecting to the hotspot:
apt install dnsmasq
Depending on the hardware you have, you may need to install the firmware-ath9k-htc package.
Creating the hotspot
The main trick is to right-click on the NetworkManager icon in the status bar and select "Edit Connections..." (not "Create New WiFi Network..." despite the promising name).
From there click the "+" button in the lower right then "WiFi" as the Connection Type. I like to use Hotspot as the "Connection name".
In the WiFi tab, set the following:
- SSID: machinename_nomap
- Mode: hotspot
- Device: (the device name of the USB WiFi adapter)
The _nomap suffix is there to opt out of the
Google and
Mozilla location services
which could allow anybody to lookup sightings of your device around the
World.
In the WiFi Security tab:
- Security: WPA & WPA2 Personal
- Password: (a 63-character random password generated using
pwgen -s 63)
While you may think that such a long password is inconvenient, it's now possible to add the network automatically by simply scanning a QR code on your phone.
In the IPv4 Settings tab:
- Method: Shared to other computers
Finally, in the IPv6 Settings tab:
- Method: Ignore
I ended up with the following config in
/etc/NetworkManager/system-connections/machinename:
[connection]
id=machinename
uuid=<long UUID string>
type=wifi
interface-name=wl...
permissions=
timestamp=1578533792

[wifi]
mac-address=<MAC>
mac-address-blacklist=
mode=ap
seen-bssids=<BSSID>
ssid=machinename_nomap

[wifi-security]
key-mgmt=wpa-psk
psk=<63-character password>

[ipv4]
dns-search=
method=shared

[ipv6]
addr-gen-mode=stable-privacy
dns-search=
ip6-privacy=0
method=ignore
Firewall rules
In order for the packets to flow correctly, I opened up the following ports on my machine's local firewall:
-A INPUT -s 10.42.0.0/24 -j ACCEPT
-A FORWARD -d 10.42.0.0/24 -m conntrack --ctstate RELATED,ESTABLISHED -j ACCEPT
-A FORWARD -s 10.42.0.0/24 -j ACCEPT
-A INPUT -d 224.0.0.251 -s 10.42.0.1 -j ACCEPT
-A INPUT -d 239.255.255.250 -s 10.42.0.1 -j ACCEPT
-A INPUT -d 10.42.0.255 -s 10.42.0.1 -j ACCEPT
-A INPUT -d 10.42.0.1 -s 10.42.0.0/24 -j ACCEPT
Starting the hotspot
If you named your network connection Hotspot, then you can start it from the command line like this:
nmcli connection up Hotspot